Monday, October 24, 2016

SharePoint 2013 change modify date of list


How to Change Modify Date of List Item:-


There are scenarios where we wish to change modify date of list, however SharePoint list form do not allow to edit modify date. Below is the CSOM to change modify date of list item. You can place below code in content editor to change the modify date:-


Thursday, April 21, 2016

How to install and use Grunt


This article depicts simplified steps to install and use Grunt. For more information about Grunt please go through following articles click here and here.

1. Go to https://nodejs.org/en/download/ to download and install node.js on your machine.
2. Go to command prompt and run following command which should display the node version installed on your machine.
node -v
3. Type npm to check node package manager is installed.
4. Install latest npm using following command
npm install npm –g
5. Run following command to Grunt's command line interface (CLI) globally.
npm install -g grunt-cli
6. In the command prompt using cd command, navigate to the project directory folder.
7. Now run following command to create default project.jason file.
npm init –f
8. Run following command to install latest version of grunt in your project. It will create node_modules folder in your project.
npm install grunt --save-dev
9. Now we will see configure grunt task to minify js file. For this install grunt-contrib-uglify plugin using following command.
npm install grunt-contrib-uglify --save-dev
10. After running above command you can observe following:-
         a. Another folder created inside node_modules folder with name grunt-contrib-uglify. Similarly you can install any plugin from npm.
         b. Package.json file is updated with
11. Now create a gruntfile.js in the same location where package.json exist (this is root folder of project).
12. Copy following code in to gruntfile.js

module.exports = function(grunt) {
  // Project configuration.
  grunt.initConfig({
    pkg: grunt.file.readJSON('package.json'),
    uglify: {
      options: {
        banner: '/*! <%= pkg.name %> <%= grunt.template.today("yyyy-mm-dd") %> */\n'
      },
      build: {
        src: 'src/<%= pkg.name %>.js',
        dest: 'build/<%= pkg.name %>.min.js'
      }
    }
  });

  // Load the plugin that provides the "uglify" task.
  grunt.loadNpmTasks('grunt-contrib-uglify');

  // Default task(s).
  grunt.registerTask('default', ['uglify']);

};

13. Now create src folder and create a js file with some js code. File name should be same as package name. Open package.json and check name property.
14. Now in the command prompt run following command
Grunt
15. This will create a minified file of js in to build folder.

Thursday, April 14, 2016

Sharepoint 2013 blank values in Taxonomy Fields


When Taxonomy Fields are used in a site collection, a hidden list is created by SharePoint to save the terms that are tagged in that Site Collections. You can access the taxonomy hidden list from URL:-

{SiteCollection}}/Lists/TaxonomyHiddenList/AllItems.aspx


There is a Timer job called "Taxonomy Update Scheduler" that does the update Operation on TaxonomyHiddenList on an hourly basis with updated value from managed meta data services.

By default TaxonomyHidden list is having read permission to "Authenticated Users". But if you remove permission of "Authenticated Users" from site then it will also remove their permissions from this taxonomy hidden list. Due to this when non administrator user browse to list then he/she we see blank values in the managed meta data columns.  For more information on this issue you can browse to this article

To resolve this issue you need to give grant permission to the TaxonomyHiddenList. Now this can be done manually or through powershell. Following is the powershell solution which iterate through all the site collection and give read permission to owner, members and visitors on the TaxonomyHiddenList:-


Monday, March 14, 2016

Sharepoint 2013 calendar overlay feature manual and automated approach


By default when we create an event in calendar it display with same colour. For e.g. below there are many calendar events created with different categories and all appearing in blue colour.


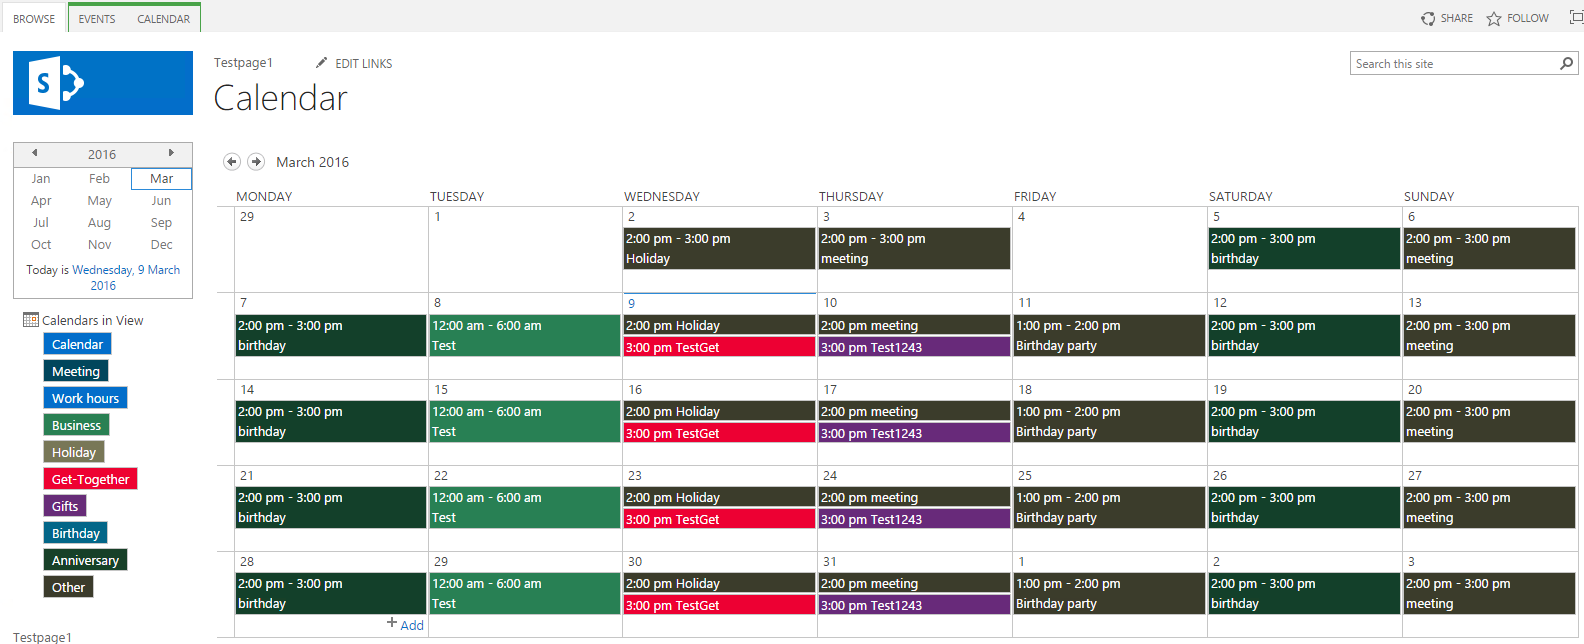
In this article we will create a feature which will assign different colour to different event category. When we enable this feature the calendar will look like as below:-


To implement this functionality you can go with one of the two approach:-

1. Calendar Overlay:- This is OOB SharePoint approach. We will be implementing this approach programmatic. So it is highly recommended to go through below article:-


2. Client side approach:- I came around one of the article which shows the client side approach:-


We will first understand how we can accomplish this by manual configuration and latter we will automate it through feature deployment.


Manual Configuration :-

By default there are 8 categories appear when we create events, therefore we need to first consider and fix color for each category:-


First select colors for each category, following image shows some colors selected for category:-


We will use SharePoint calendar overlay mechanism to enable coloring of event. According to this mechanism if we create different calendar overlay and assign a view to each overlay then at the time of rendering SharePoint display all the overlay together combined in single view. It sounds little complex to understand therefore let’s do it and see actually how it works.

First step is to create views for each category. Below I have created view for each category:-


Note while creating above views we have to put filter criteria for category, so that view only active when condition matches.


Update calendar view and put filter condition matches below:-


For "other" view put condition as below. Basically you are applying other view to appear when there is category other than any of standard 8 categories:-


Now create calendar overlay for each category as follows:-


Please note while creating overlay for each calendar overlay associate a color to display and associate view to take effect which we created earlier:-


That's it, now when you choose “Overlay” in “current view”, you will notice each category appears in different color in the calendar :-


Code approach:-

In this section we will automate all the manual steps mentioned above. We will be creating a site collection feature “Calendar Overlay”. On activation of this feature we will create views, overlays etc…:-

1. Below is Feature activation event where we will be creating view, creating calendar overlay etc. for each operation we have separate function which will be discussed in next steps:- 

       public override void FeatureActivated(SPFeatureReceiverProperties properties)
        {
            string calendarList = "Calendar";
            string[] targetwebpartTitle = { "Team Calendar", "Contract Calendar", "Community Calendar", "Project Calendar", "Project Calendar", "Bid Calendar" };
            string[] viewArray = { "Meeting", "Work hours", "Business", "Holiday", "Get-Together", "Gifts", "Birthday", "Anniversary", "Other" };
            int[] colorArray = { 1, 2, 3, 4, 5, 6, 7, 8, 9 };
            string targetViewTitle = "Calendar";
            string pageUrl = "Pages/default.aspx";


            using (SPSite site = properties.Feature.Parent as SPSite)
            {
                SPWeb web = site.RootWeb;
               // SPWeb web = properties.Feature.Parent as SPWeb;
                SPList list = web.Lists[calendarList];
                SPViewCollection allviews = list.Views;

                //Create all views in calendar list
                CreateViews(web, viewArray, allviews, list);

               
                // refetch web and list objects as otherwise earlier updates make the next piece of code fail
                web = site.RootWeb;
                list = web.Lists.TryGetList(calendarList);

                //Add calendar overaly for each views added above
                AddAllCalendarOverlay(list, viewArray, colorArray);

                //Update calendar view filter
                UpdateCalendarView(list);

                //Update calendar webpart to refer default view.
                UpdateCalendarViewWebPart(web, list, pageUrl, targetwebpartTitle, targetViewTitle);
            }

        }

2. In below code we are creating view for each category of event. For e.g. for meeting category create meeting view, for birthday category create birthday view and so on. Note in below code i have put a condition so that the filter for "Other" view is different:-
 

        public void CreateViews(SPWeb web, string[] viewArray, SPViewCollection allviews, SPList list)
        {
            // For each item in view array create view.
            foreach (string viewName in viewArray)
            {
                System.Collections.Specialized.StringCollection viewFields = list.Views["Calendar"].ViewFields.ToStringCollection();

                string myquery = "" + viewName + "";
                               

                if (viewName.Equals("Other"))
                {
                    myquery = GetFilterQueryForOther();
                }

                SPView newView = allviews.Add(viewName, viewFields, myquery, 100, true, false, SPViewCollection.SPViewType.Calendar, false);
                newView.Scope = SPViewScope.Recursive;
                

                newView.ViewData = GetViewDataQuery();

                newView.Update();
                Addrecurrence(newView);

            }

        }

        public string GetFilterQueryForOther()
        {
            string camlQuery = @"


                                            Meeting


                                               Work hours


                                                  Business


                                                     Holiday


                                                        Get-together


                                                           Gifts


                                                              Birthday


                                                              Anniversary


                                   ";

            return camlQuery;
        }

        public string GetViewDataQuery()
        {
            string camlQuery = @"
                                         
                                        
                                        ";

            return camlQuery;
        }

 /// 
        /// This is required to set reoccurance property. Without this we will see issue in reoccurance event.
        /// 
        /// 
        public void Addrecurrence(SPView viewMasterCalendar)
        {
            using (var webPartManager = viewMasterCalendar.ParentList.ParentWeb.GetLimitedWebPartManager(viewMasterCalendar.Url, PersonalizationScope.Shared))
            {
                foreach (Microsoft.SharePoint.WebPartPages.WebPart webPart in webPartManager.WebParts)
                {
                    if (webPart is IListWebPart)
                    {
                        var listWebPart = (IListWebPart)webPart;
                        if ((listWebPart.ViewFlags | SPViewFlags.RecurrenceRowset) != SPViewFlags.RecurrenceRowset)
                        {
                            listWebPart.ViewFlags = listWebPart.ViewFlags | SPViewFlags.RecurrenceRowset;
                            webPartManager.SaveChanges(webPart);
                        }
                    }
                }
            }
        }

        /// 
        /// Update calendar view filter
        /// 
        /// 
        public void UpdateCalendarView(SPList list)
        {

            SPView calendarView = list.Views["Calendar"];
            calendarView.Query = "";
            calendarView.Update();

        }


3. Below code is to create calendar overlay for each view we have created:-


        /// 
        /// Add calendar overlay for the view created previously.
        /// 
        /// 
        /// 
        public void AddAllCalendarOverlay(SPList list, string[] viewArray, int[] colorArray)
        {
            for (int i = 0; i < colorArray.Length; i++)
            {
                AddCalendarOverlay(list, viewArray[i], list, colorArray[i], false, false);
            }

        }

       public void AddCalendarOverlay(SPList targetList, string viewName, SPList overlayList, int color, bool alwaysShow, bool clearExisting)
        {
            bool sharePoint = overlayList != null;
            string linkUrl = string.Empty;

            if (sharePoint)
                linkUrl = overlayList.DefaultViewUrl;

            SPView targetView = targetList.DefaultView;
            /*if (!string.IsNullOrEmpty(viewName))
                targetView = targetList.Views[viewName];*/

            XmlDocument xml = new XmlDocument();
            XmlElement aggregationElement = null;
            int count = 0;
            if (string.IsNullOrEmpty(targetView.CalendarSettings) || clearExisting)
            {
                xml.AppendChild(xml.CreateElement("AggregationCalendars"));
                aggregationElement = xml.CreateElement("AggregationCalendar");
                xml.DocumentElement.AppendChild(aggregationElement);
            }
            else
            {
                xml.LoadXml(targetView.CalendarSettings);
                XmlNodeList calendars = xml.SelectNodes("/AggregationCalendars/AggregationCalendar");
                if (calendars != null)
                    count = calendars.Count;
                //aggregationElement = xml.SelectSingleNode(string.Format("/AggregationCalendars/AggregationCalendar[@CalendarUrl='{0}']", linkUrl)) as XmlElement;
                //if (aggregationElement == null)
                //{
                if (count >= 10)
                    throw new SPException(string.Format("10 calendar ovarlays already exist for the calendar {0}.", targetList.RootFolder.ServerRelativeUrl));
                aggregationElement = xml.CreateElement("AggregationCalendar");
                xml.DocumentElement.AppendChild(aggregationElement);
                //}
            }
            if (!aggregationElement.HasAttribute("Id"))
                aggregationElement.SetAttribute("Id", Guid.NewGuid().ToString("B", CultureInfo.InvariantCulture));

            aggregationElement.SetAttribute("Type", "SharePoint");
            //aggregationElement.SetAttribute("Name", overlayList.Title);
            aggregationElement.SetAttribute("Name", viewName);
            aggregationElement.SetAttribute("Description", overlayList.Description);
            aggregationElement.SetAttribute("Color", ((int)color).ToString());
            aggregationElement.SetAttribute("AlwaysShow", alwaysShow.ToString());
            aggregationElement.SetAttribute("CalendarUrl", linkUrl);

            XmlElement settingsElement = aggregationElement.SelectSingleNode("./Settings") as XmlElement;
            if (settingsElement == null)
            {
                settingsElement = xml.CreateElement("Settings");
                aggregationElement.AppendChild(settingsElement);
            }
            if (sharePoint)
            {
                settingsElement.SetAttribute("WebUrl", overlayList.ParentWeb.Site.MakeFullUrl(overlayList.ParentWebUrl));
                settingsElement.SetAttribute("ListId", overlayList.ID.ToString("B", CultureInfo.InvariantCulture));
                //settingsElement.SetAttribute("ViewId", overlayList.DefaultView.ID.ToString("B", CultureInfo.InvariantCulture));
                settingsElement.SetAttribute("ViewId", overlayList.Views[viewName].ID.ToString("B", CultureInfo.InvariantCulture));
                settingsElement.SetAttribute("ListFormUrl", overlayList.Forms[PAGETYPE.PAGE_DISPLAYFORM].ServerRelativeUrl);
            }

            targetView.CalendarSettings = xml.OuterXml;
            targetView.Update();
            
        }

4. Below code is optional and can be used if the list view webpart is placed on the webpage. In this case we need to modify view setting of the list view web part:-
        /// 
        /// //Update calendar webpart to refer default view.
        /// 
        /// 
        /// 
        /// 
        /// 
        /// 
        public void UpdateCalendarViewWebPart(SPWeb oWeb, SPList oList, string pageUrl, string[] targetwebpartTitle, string targetViewTitle)
        {
            /// Gets the page SPFile objectC
            SPFile pageSPFile = oWeb.GetFile(pageUrl);
            try
            {
                //// If file is not checked out then do a check out
                if (pageSPFile.Level != SPFileLevel.Checkout)
                {
                    pageSPFile.CheckOut();
                }

                SPLimitedWebPartManager oWebPartManager = oWeb.GetLimitedWebPartManager(pageUrl, PersonalizationScope.Shared);// change the wepart page absolute URL to your webpart page URL
                foreach (System.Web.UI.WebControls.WebParts.WebPart oWebpart in oWebPartManager.WebParts)
                {
                    if (targetwebpartTitle.Contains(oWebpart.Title.Trim()))
                    {

                        ListViewWebPart myWebPart = (ListViewWebPart)oWebpart;

                        SPView targetView = oList.Views[targetViewTitle];

                        Guid oGuid = new Guid(myWebPart.ViewGuid);
                        SPView oWebPartView = oList.Views[oGuid];

                        oWebPartView.ViewFields.DeleteAll();// deleting the existing view fields for adding new one

                        foreach (string strField in targetView.ViewFields)
                        {
                            oWebPartView.ViewFields.Add(strField);
                        }

                        oWebPartView.Query = targetView.Query;
                        oWebPartView.RowLimit = targetView.RowLimit;
                        oWebPartView.ViewEmpty = targetView.ViewEmpty;
                        oWebPartView.ViewFooter = targetView.ViewFooter;
                        oWebPartView.ViewHeader = targetView.ViewHeader;
                        oWebPartView.Scope = targetView.Scope;
                        oWebPartView.GroupByFooter = targetView.GroupByFooter;
                        oWebPartView.GroupByHeader = targetView.GroupByHeader;
                        oWebPartView.CalendarSettings = targetView.CalendarSettings;
                        oWebPartView.Update();
                        oWebPartManager.SaveChanges(myWebPart);

                        break;

                    }
                }
                oWeb.Update();

            }
            catch (Exception ex)
            {
                throw ex;
            }
            finally
            {
                if (pageSPFile.Level == SPFileLevel.Checkout)
                {
                    pageSPFile.CheckIn("Setting view for calendar webpart");
                }
            }
        }

The end result is we have a site collection feature ready to do the magic of coloring events.  To test this first create number of events in the calendar. You will observe all events are displaying with same color:-


Now go to site collection feature and enable calendaroverlay feature we created through code approach.


Navigate back to calendar list and you will observe all the events are now appearing in color:-


I hope this article have helped you. Looking forward for your comments. Thanks for reading.

Monday, February 8, 2016

URL validation in sharepoint through javascript

In SharePoint 2013 there are cases when you would like to validated client side URL and prompt user if it is invalid URL. Below code snippet can be used for this validation. Edit newform.aspx and editform.aspx, place a script editor webpart with following code snippet. You can alternatively created feature and on feature activation event add script edit, inject this js code.


Calendar new form and edit form date validation in SharePoint 2013 through javascript


Sharepoint provide facility to implement validation in the list through validation settings option which exist in the list setting. However, this validation does exist for new and edit forms. There are some situations when you want to implement different validation for different form. In such cases you can implement client site script for validation.

In the below example on the calendar list business want to implement following validation:-
  •  In the new form user can create event for present or future date. That means the start date should be greater than now.
  • In the edit form user should be able to edit the date to past date but should not edit it to before created date. That means Start date should be greater than created date.


You can leverage below code snippet to implement validation mention in point 1 for new form.  Edit newform.aspx and add a script editor web part. Put below snippet in the script editor web part.


You can leverage below code snippet to implement validation mention in point 2 for edit form. Edit editform.aspx and add a script editor web part. Put below snippet in the script editor web part.